Install and Activate
Free version:
Via the Plugin Admin Dashboard
- From the WordPress Admin screen, go to ‘Plugins’ >> ‘Add New’.
- In the ‘Search Plugins’ custom field, search for WP Coder.
- Select ‘WP Coder – add custom HTML, CSS, and js code’ by Wow-Company. Click on the ‘Install Now’ button.
- Click on the ‘Activate’ button to activate the plugin on your site.
Via the WordPress.org Plugin Repository
- Visit the ‘WP Coder’ plugin page in the WordPress.org plugin repository.
- Select the ‘Download’ button to download a zip archive of the plugin to your computer.
- From the WordPress Admin, go to ‘Plugins’ >> ‘Add New’ and at the top of the page, select the button labeled ‘Upload Plugin’.
- On the ‘Add Plugins’ page, follow the prompts to upload your zip archive to the plugin directory on your site.
- Install and activate the plugin.
Via a File Transfer Protocol (FTP) Client
To install Popup Maker manually via an (S)FTP client, see the Manual Plugin Installation guide on the WordPress Codex.
Pro version Pro
- Download the PRO version via the link in the email or in your dashboard on Wow-Estore.com
- Install the PRO version from the WordPress Admin, go to ‘Plugins’ >> ‘Add New’ and at the top of the page, select the button labeled ‘Upload Plugin’
- On the ‘Add Plugins’ page, follow the prompts to upload your zip archive to the plugin directory on your site.
- Activate the Pro version
- Deactivate the Lite version
- Go to the plugin page
- Enter the license key
- Click the button ‘Activate License’

HTML Code

The WP Coder plugin comes with a powerful HTML Code feature, providing you with a simple and efficient way to add custom HTML code to your WordPress site.
With this feature, you can embed custom HTML anywhere on your website, giving you the flexibility to tailor your pages exactly how you wish. Whether you’re looking to add a personalized form, a unique navigation bar, or any other HTML-based element, the HTML Code feature can help you do that seamlessly.
Using the HTML Code is straightforward. After you’ve activated the WP Coder plugin, simply navigate to the WP Coder settings in your WordPress dashboard. There, you’ll find an HTML code editor where you can write or paste your custom HTML. Once done, save your changes and use the provided shortcode to insert your custom HTML block anywhere on your site – in pages, posts, or widgets.
Please note that, as with any custom code, you should always double-check your HTML for any potential errors before adding it to your site, as incorrect code could potentially disrupt your site’s layout or functionality.
CSS Code

The WP Coder plugin boasts a flexible CSS Code option, allowing you to easily add custom CSS styles to your WordPress site for a personalized look and feel.
With this feature, you can tailor elements on the webpage appearance by modifying elements such as colors, fonts, layouts, and more. It’s a powerful tool that lets you refine the visual presentation of your site beyond the limitations of your chosen theme or page builder.
To use the CSS Code feature, first, ensure the WP Coder plugin is activated. Then, navigate to the WP Coder settings from your WordPress dashboard. Here, you’ll find a dedicated CSS code editor where you can write or paste your custom CSS. Once you’ve input your desired styles, save your changes. The custom CSS will then apply to your web pages where you need it, or you can use the generated shortcode to insert the custom CSS into specific pages, posts, or widgets.
Please remember that when working with CSS or any type of code, precision is key. Ensure your CSS syntax is correct to prevent any unwanted visual changes or disruptions to your site’s design.
Also, you can enable the next option for your custom CSS code:
‘Inline’: This useful feature allows you to insert your custom CSS code directly into your webpage as inline styles.
‘Minified’: Minification is a technique used to improve your website’s loading speed by reducing the size of your CSS files. When you enable the “Minified” option in WP Coder, it automatically removes all unnecessary characters (like spaces, line breaks, and comments) from your CSS code without changing its functionality. The result is a smaller, more streamlined CSS file that can be downloaded faster by your site visitors, leading to improved website speed and performance. It’s a simple yet powerful way to optimize your site for better user experience and SEO.
JS Code
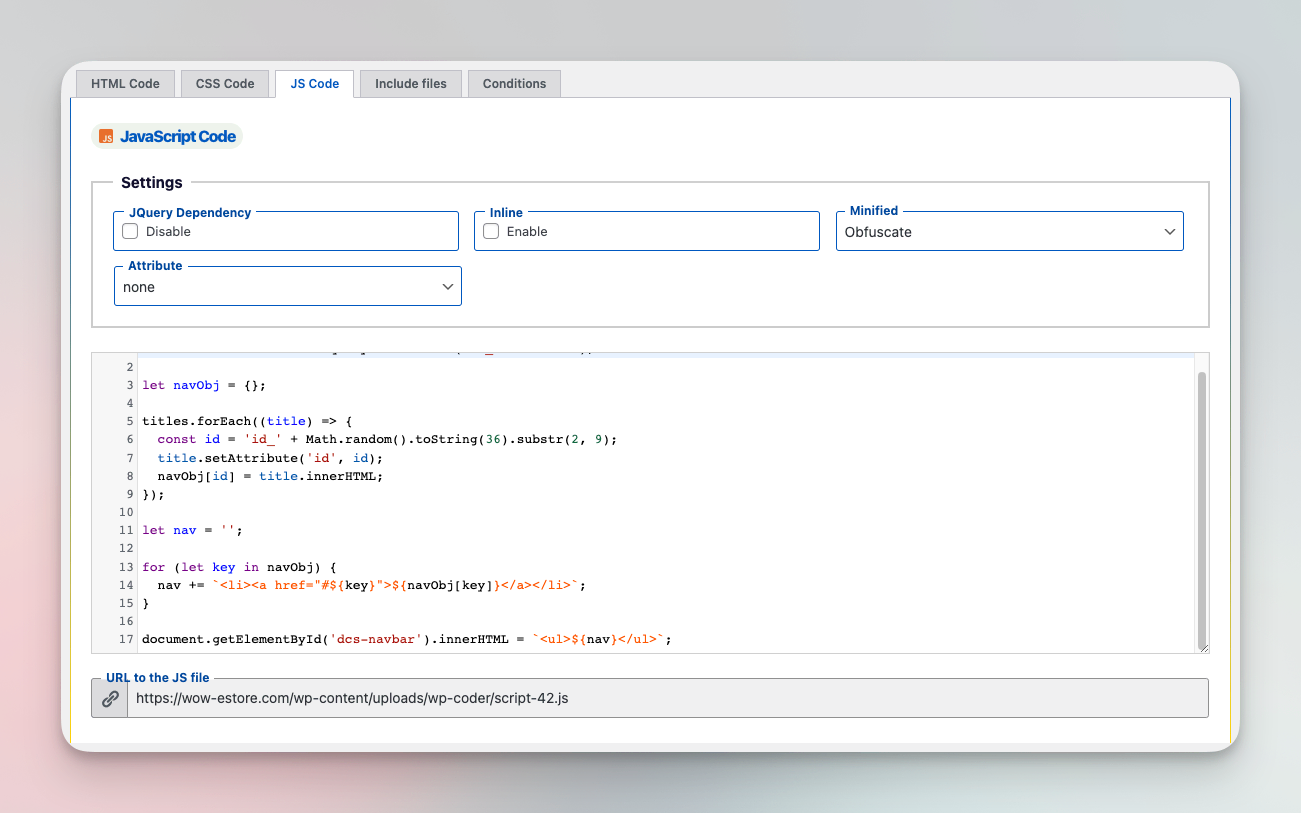
The WP Coder plugin’s JS Code option allows you to incorporate custom JavaScript (JS) into your WordPress site. With this feature, you can enhance your website’s interactivity and user engagement by creating dynamic content and functionalities.
JavaScript can be used for a wide variety of tasks on your site, such as form validation, interactive elements like sliders and carousels, creating complex animations, and much more.
To use the JS Code feature, make sure the WP Coder plugin is active on your site. Then, go to the WP Coder settings in your WordPress dashboard. There you will find a dedicated JS code editor where you can write or paste your custom JavaScript. After inputting your JS code and saving your changes, the custom JavaScript will be implemented on your site. You can also use the generated shortcode to insert your JS code on specific pages, posts, or widgets as required.
Remember, JavaScript is a powerful tool, but it should be used judiciously. Incorrect or excessive JS can potentially cause performance issues or conflicts with other scripts on your site. Always double-check your JavaScript for errors before implementing it.
Also, you can enable the next option for your custom CSS code:
“JQuery Dependency” Option: This option ensures that your custom JavaScript code is executed only after jQuery, a popular JavaScript library, has fully loaded on your site.
“Inline” Option: Similar to the CSS inline option, this feature allows you to place your custom JavaScript directly within your HTML document, as opposed to linking to an external .js file. This can be useful for scripts that are specific to a single page and are not very large. Keep in mind, though, inline scripts can increase the overall size of your HTML document and could impact your website’s load times if overused.
“Minified/Obfuscate” Option: Enabling this option will minify your JavaScript, removing all unnecessary characters such as spaces, line breaks, and comments to make the file size smaller. This can improve your site’s loading speed. Obfuscation goes a step further by also transforming the code into an equivalent, harder-to-understand format to protect it from reverse-engineering or copying.
“Attribute (defer, async)” Option: These attributes alter how your JavaScript loads relative to the rest of your webpage. The “async” attribute allows your script to load and execute asynchronously with the rest of the webpage, meaning it won’t block the loading of other elements. The “defer” attribute ensures your script won’t execute until the HTML document has fully loaded. Both attributes can improve page load performance, but each has unique implications and use cases depending on how your JavaScript interacts with your webpage.
Remember, when using these options, always ensure your scripts are functioning as expected. The wrong settings can lead to unexpected results or even broken functionality on your site. Always test your changes thoroughly before implementing them on your live site.
Include files
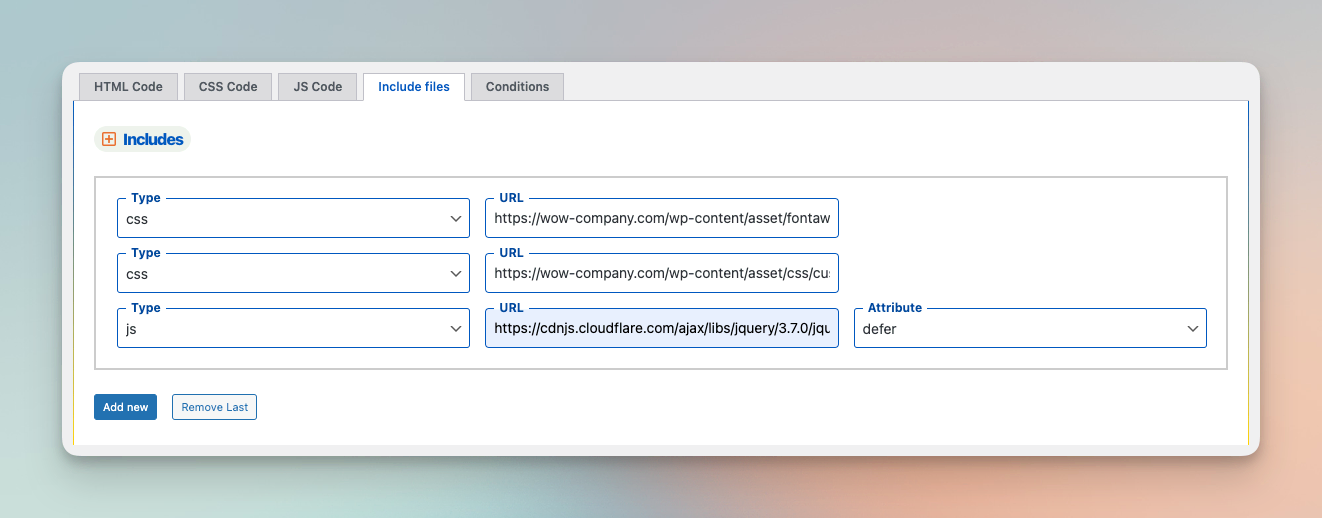
The WP Coder plugin provides a convenient option to include external CSS or JS files on your WordPress site by simply inserting the link to the file. This means you can utilize stylesheets or scripts hosted elsewhere without having to upload them to your own site.
To use this feature, navigate to the WP Coder settings in your WordPress dashboard, and in the appropriate section, insert the URL of the CSS or JS file you wish to include. This method is useful when you’re using a library or a framework hosted on a CDN (Content Delivery Network), or if you want to maintain the same version of a script or stylesheet across multiple sites.
Adding ‘defer’ and ‘async’ Attributes to JS Files: WP Coder allows you to add the ‘defer’ and ‘async’ attributes to the external JS files you include through the plugin. These attributes control how your JS files are loaded relative to your webpage’s loading, potentially improving your site’s performance.
When you include a JS file link, you’ll see options to add these attributes. By selecting ‘defer’, your JS file will not execute until your HTML document has fully loaded. By selecting ‘async’, your JS file will load and execute asynchronously with your HTML document, meaning it won’t prevent other elements from loading.
Remember to always test any changes thoroughly before applying them to your live site, especially when including external files, as these can sometimes cause conflicts or unexpected behavior.
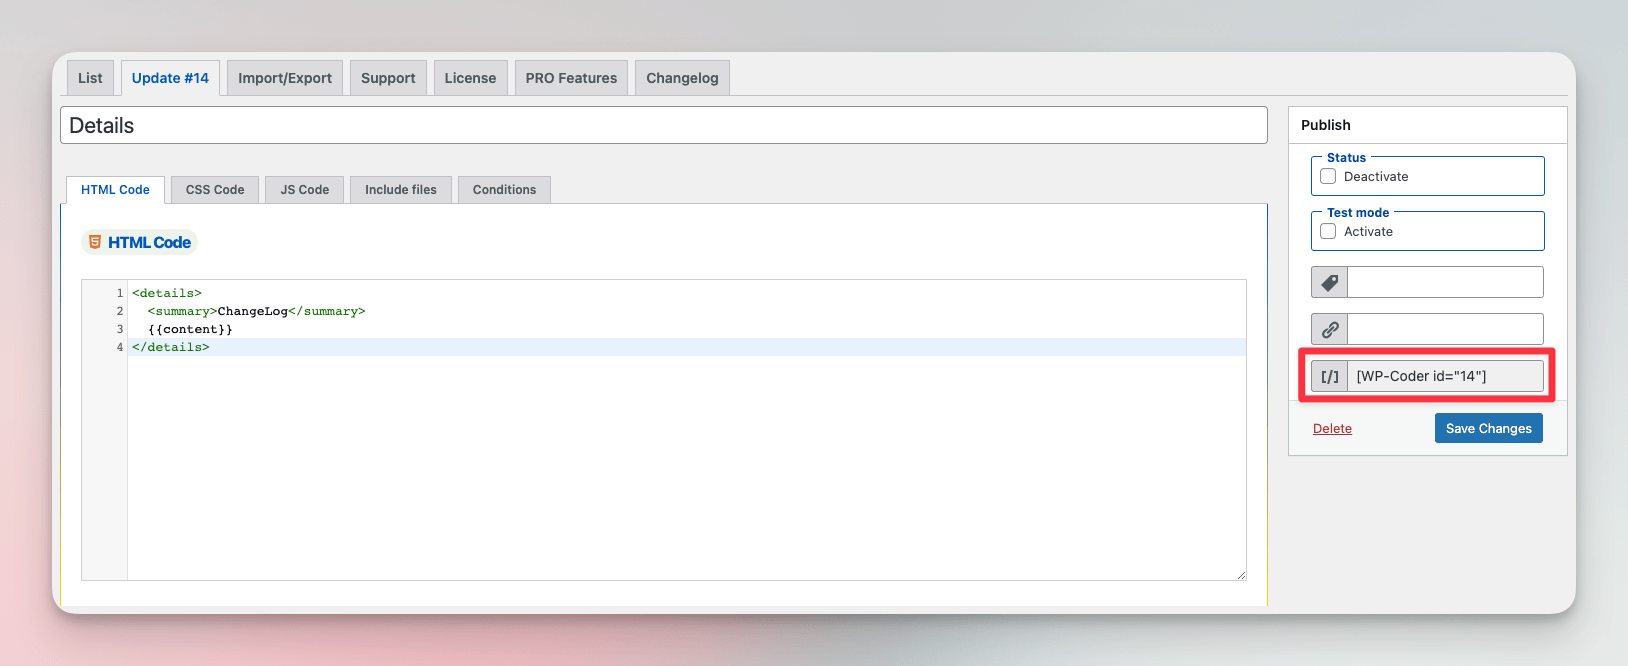
Publish

The WP Coder plugin includes a variety of Publish Options that give you complete control over how and when your item is used on your site. These options include:
Status (activate/deactivate): This option lets you easily turn your custom code on or off. This can be helpful when you need to troubleshoot issues or when you want to stop using a piece of code temporarily without deleting it.
Test Mode: With this feature, you can safely test your new code without affecting your live site. When Test Mode is activated, only administrators can see the effects of the code. This is a great way to ensure your code works as expected before showing it to all your visitors.
Insert Tag for Organizing Items (Optional): This option lets you add tag to your items, making it easier to categorize and manage them. This can be especially handy when you have many pieces of items and need an efficient way to find specific ones.
Link to the Page with Item (Optional): This feature allows you to add a link to the specific page where your code snippet will be active. It’s a convenient way to keep track of where your various code snippets are being used across your site.
Shortcode: After you’ve added your custom code, the plugin will generate a unique shortcode. You can use this shortcode to add your code anywhere shortcodes are accepted on your site, such as posts, pages, or widgets. This allows you to easily control where your code is implemented without having to edit your theme files.
These options ensure you can effectively manage and control your custom code, enhancing your site’s performance and the overall user experience.
Display Conditions PRO

WP Coder offers a versatile set of Display Conditions options, giving you granular control over when and where your custom code is implemented on your WordPress site. These conditions include:
- Display Rules: This option lets you control the specific pages, posts, or other areas of your site where your custom code will run. For instance, you can set your code to run only on specific posts, only on your homepage, or everywhere except a certain page.
- Devices Rules: With this feature, you can decide on which devices your custom code will run. This is particularly useful for implementing code that enhances or optimizes the user experience for specific devices, such as mobile phones or tablets.
- Users Rule: This option allows you to control which users see the effects of your custom code based on their user role. For example, you might want to implement certain changes that only administrators or subscribers will see.
- Browsers Rules: This feature enables your code to run only on specific browsers. It’s handy when you have certain scripts or styles that work better or are only needed on specific browsers.
- Language Rule: With this feature, you can run your custom code based on the language of your site. This is particularly useful for multilingual websites where you may want to apply different scripts or styles for different languages.
- Schedule: This powerful feature allows you to control when your code is implemented based on a specific schedule. You can set start and end dates and times, allowing you to seamlessly run holiday-themed changes, timed promotions, or any other temporary changes.
With these options, you have the flexibility to ensure that your custom code executes precisely under the conditions you specify, enhancing your site’s performance and user experience.
Page Template PRO
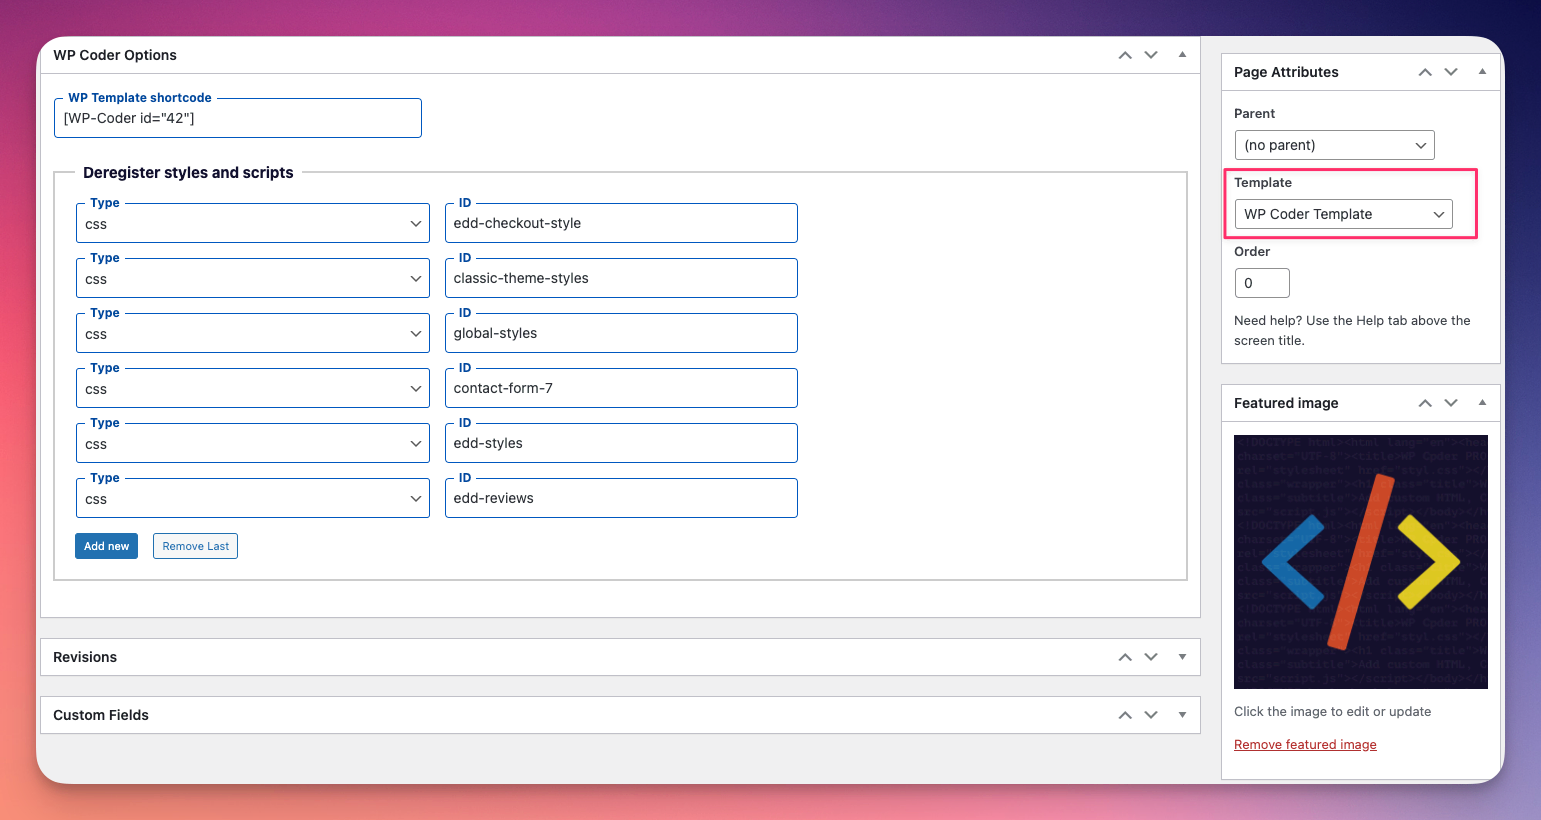
The WP Coder plugin offers a unique Page Template feature that provides you with a blank canvas to start your design. This can be particularly useful when you need a fully customized page that differs significantly from your theme’s default styles and layout.
One of the key features of the WP Coder Page Template is the option to deregister CSS and JS on the template. This gives you the ability to exclude specific stylesheets or scripts from the page, providing an even more minimal starting point for your design and potentially improving page load times.
To deregister a CSS file, simply insert its ID without the -css ending. For inline CSS, you’d use the ID without the -inline-css ending. Similarly, for deregistering a JS file, insert its ID without the -js ending. Deregistering scripts and styles can be useful when you’re dealing with conflicts, or when you don’t need a particular script or style on a specific page.
Moreover, the template feature allows you to use a shortcode that generates code as a template. By entering this shortcode, your custom code is applied directly to the page template, giving you a powerful way to create complex, fully customized pages.
Remember, the WP Coder Page Template is a powerful tool that should be used with care. Make sure to thoroughly test your pages in various browsers and devices to ensure a consistent user experience.
Shortcodes PRO
The WP Coder plugin supports the use of custom shortcodes in the HTML block. When used as a template for a page, these shortcodes can dynamically output specific details about that page. They provide a versatile way to include dynamic data in your custom designs. The shortcodes include:
- [[wpc_the_title]]: This shortcode will display the title of the current page. It’s a great tool for when you need to include the page title in your custom code, and it will update dynamically if the title changes.
- [[wpc_the_thumbnail_url]]: This shortcode will output the URL of the featured image of the current page. It can be handy when you’re custom-coding a design that includes a featured image and you want that image to update dynamically when it’s changed in the WordPress editor.
- [[wpc_the_thumbnail_alt]]: This shortcode will output the alt text of the featured image of the current page. Alt text is important for accessibility and SEO, and this shortcode ensures that it’s included in your custom designs.
- [[wpc_the_page_content]]: This shortcode will output the actual content of the page. It’s especially useful when you want to design a custom layout around the content of a page, as it allows you to place that content anywhere within your layout.
- [[wpc_custom_field field=”field_name”]]: This shortcode allows you to output a custom field created for the page. You simply insert the custom field name in the ‘field’ attribute. Custom fields are a powerful feature of WordPress, and this shortcode makes it easy to include the data stored in those fields in your custom code.
These custom shortcodes provide a dynamic element to your custom HTML, allowing your designs to be more flexible and adaptable.
Always remember to replace ‘field_name’ with your actual custom field name when using the wpc_custom_field shortcode.
Example of the shortcodes uses for WP Coder Page Template

[[wpc_content]]: This shortcode is a tool that enables you to encapsulate and manipulate any content by applying a pre-defined code created using WP Coder. This provides the freedom to control various aspects of WordPress posts, pages with custom code, enhancing flexibility and customization options within your website.
The shortcode utilizes the ‘id’ attribute to designate which code created using WP Coder is going to be applied. The ‘id’ attribute here is unique and ties directly to the specific piece of code you aim to implement, lending precision and control over the content modification process.
For instance, you can use the shortcode as follows:
[[wpc_content id="14"]Your Content Here[/wpc_content]]
In this example, ‘code_id’ refers to the specific ID of a code block you have created in WP Coder. The ‘Your Content Here’ is the stand-in for any content that you wish to display and modify using the specific code. The ‘wpc_content’ shortcode then utilisizes the associated code to your content, applying any modifications or enhancements contained within the selected code block. Use the code like {{content}} in youe WP Coder content.
Shortcodes for script and style
The WP Coder plugin includes two powerful shortcodes, [[wpc_script]] and [[wpc_style]], which let you easily add scripts and styles to your pages respectively.
[[wpc_script]]: This shortcode lets you add a script to your page. You can use any attributes that are valid for a script tag. For instance, you can specify the source of the script with the ‘src’ attribute, and use other attributes like ‘async’, ‘defer’, and ‘crossorigin’. Here’s an example usage:
[[wpc_script src="https://utteranc.es/client.js" repo="ENTER REPO HERE" issue-term="pathname" theme="github-light" crossorigin="anonymous" async]]
In this example, a script is added from ‘https://utteranc.es/client.js’, and several other attributes are also used to customize how the script is loaded and behaves.
[[wpc_style]]: This shortcode lets you add a CSS stylesheet to your page. You can use any attributes that are valid for a link tag. For instance, you can specify the source of the stylesheet with the ‘href’ attribute, and use other attributes like ‘type’, ‘rel’, and ‘preconnect’. Here’s an example usage:
[[wpc_style rel="stylesheet" href="style.css" type="text/css" preconnect]]
In this example, a stylesheet named ‘style.css’ is added to the page. The ‘rel’ attribute specifies that this is a stylesheet, the ‘type’ attribute specifies that it’s CSS, and the ‘preconnect’ attribute can help improve the performance of fetching the stylesheet.
Other Shortcodes:
Shortcode [[wpc_user]]
The WP Coder plugin includes the [[wpc_user]] shortcode, a powerful tool that allows you to display content based on the user’s login status or role.
The shortcode uses the ‘role’ attribute to control who can see the content. Here’s how it works:
- If the role attribute is left empty ([[wpc_user role=””]]), the content will be displayed only to logged-in users, regardless of their specific user role. This is useful for showing content that is relevant to all authenticated users.
- If the role attribute is set to “none” ([[wpc_user role=”none”]]), the content will be shown to visitors who are not logged in. This can be helpful for displaying prompts for users to log in or register.
- If you specify one or more roles in the role attribute, like this: [[wpc_user role=”Administrator, Subscriber”]], the content will only be shown to users who have one of the specified roles. This is a powerful feature that allows you to customize the user experience based on their role. For instance, you could display different content to administrators and subscribers.
Remember to always use the exact role names as they are defined in your WordPress site when using the ‘role’ attribute.
By leveraging the [[wpc_user]] shortcode, you can create highly tailored experiences for different user types on your WordPress site, increasing the relevance and effectiveness of your content.
Example of the shortcodes:
![Shortcode [wpc_user]](https://wow-estore.com/wp-content/uploads/2023/08/wpc_user-opt.png)