Monobase Documentation v 1.0
Theme Monobase
Installation
Installing Monobase is quick and straightforward. You can set it up using either the WordPress dashboard or manual upload.
1. Install via WordPress Dashboard
- Log in to your WordPress admin panel.
- Go to Appearance → Themes → Add New.
- Click Upload Theme.
- Choose the
monobase.zipfile from your computer. - Click Install Now and then Activate.
2. Manual Installation via FTP
- Extract the
monobase.zipfile on your computer. - Connect to your server using FTP or your hosting file manager.
- Upload the extracted
monobasefolder to:/wp-content/themes/ - Go to Appearance → Themes in your dashboard.
- Activate Monobase.
3. Verify Installation
Once activated, you’ll see Monobase as your active theme. You can now:
- Customize homepage and dark mode.
- Add your logo.
- Configure menus.
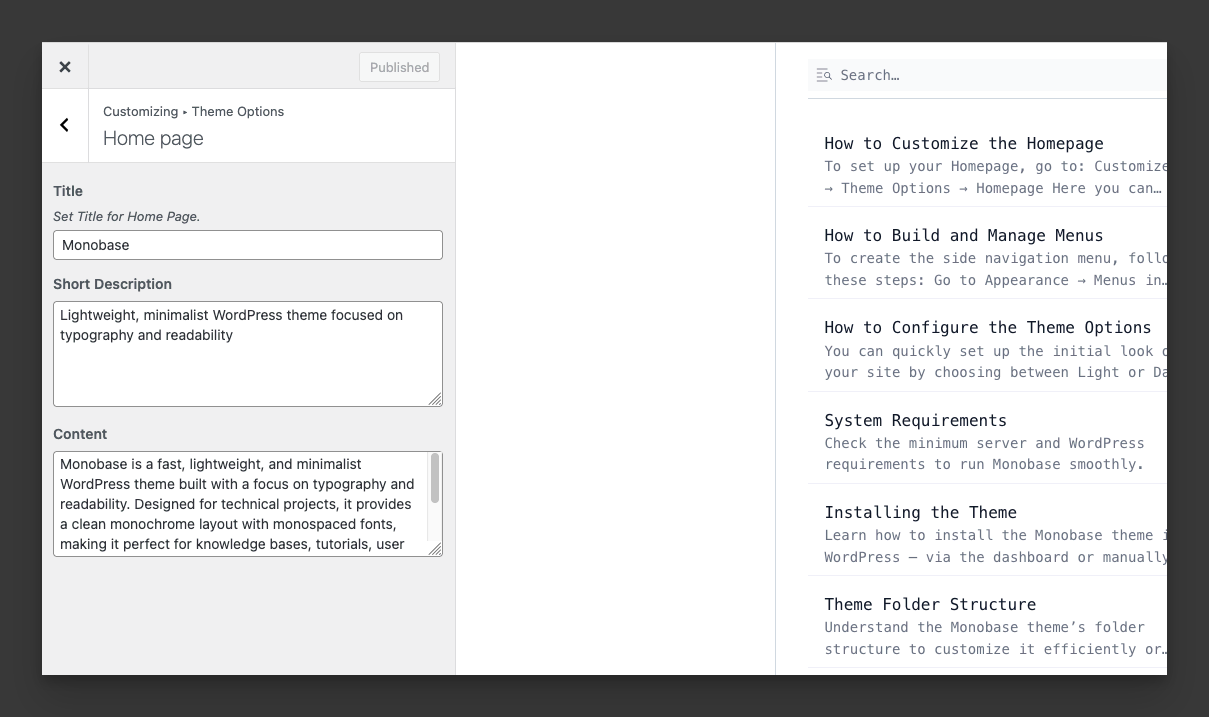
Homepage
To set up your Homepage, go to:
Customizer → Theme Options → Homepage
Here you can configure:
- Title — the main heading of the homepage
- Short Description — a short introduction or tagline
- Content — additional text or instructions
Homepage Menu
You can also create a dedicated menu that will appear on the homepage between the Short Description and Content.
- Go to Appearance → Menus
- Create or edit a menu
- Set Display location → Home Page
Menu Items
- Each menu item is displayed as a card in a two-column layout.
- The Title comes from the menu item’s label.
- The Description (up to ~115 characters) will be shown under the title.
- Descriptions are trimmed to 3 lines max for a clean, consistent look.
How to Enable Menu Descriptions
By default, WordPress hides the description field for menu items.
To enable it:
- In the Menus screen, click Screen Options (top-right corner).
- Check the box for Description.
- Now you can add descriptions to each menu item.
> 💡 Tip: Keep menu descriptions short and clear for the best visual balance.
Set Logo, Title, and Tagline
To configure your site’s identity, go to:
Customizer → Site Identity
Here you can set:
- Logo — upload an image that represents your brand.
- Site Title — the main title of your website, displayed in the header and metadata.
- Tagline — a short description of your site’s purpose.
- The tagline is limited to 35 characters.
- If it is longer, it will be automatically trimmed for consistency.
Placement
The Logo, Title, and Tagline appear together in the bottom-left corner of the site, right below the sidebar menu.
> 💡 Tip: Keep the tagline concise and descriptive.
> Example: "Clean and Minimal WordPress Docs"
![]()
Build and Manage Menus
To create the side navigation menu, follow these steps:
- Go to Appearance → Menus in your WordPress dashboard.
- Create a new menu or edit an existing one.
- In Menu Settings → Display location, check Side Menu.
- Add items (pages, categories, custom links, etc.) as needed.
- You can organize items into two levels (parent → child) for structured navigation.
> 💡 Tip: Use clear and concise labels so visitors can easily find the content they need.
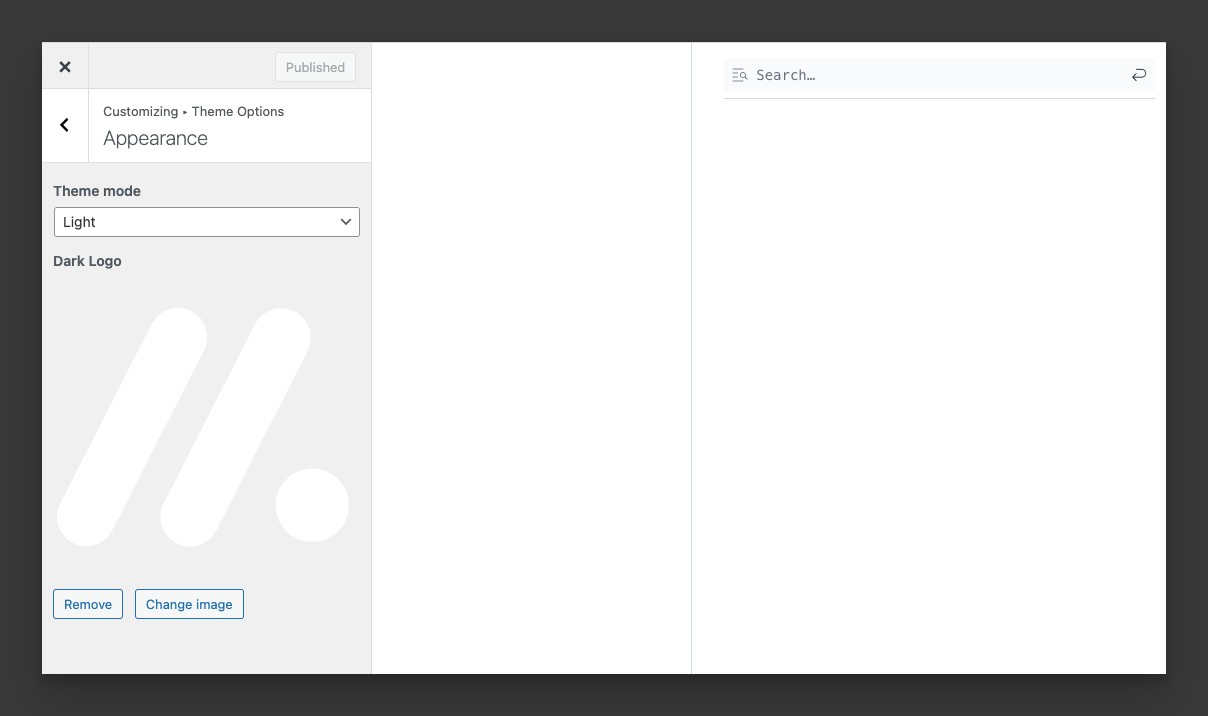
Configure the Theme Options
The theme includes simple options to control its appearance.
- Go to Customizer → Theme Options → Appearance
- Choose the default theme mode:
- Light (default)
- Dark
- Upload a dedicated logo for Dark Mode to ensure brand visibility in both styles.
These settings allow you to match the design of your documentation site with your brand identity and give visitors a comfortable reading experience.
Page Layout Types
1. Default
- Width: max-width
90rem - Provides comfortable line length and balanced white space.
2. Full Page
- Width: 100% (full width of the browser window)
- ✅ Best for: landing pages, wide tables, diagrams, or embedding external tools
- Ideal when you need maximum horizontal space.
3. Focus Page
- Width: max-width
50rem - ✅ Best for: focused reading experiences, minimal guides, or blog-style posts
- Narrow column improves readability for dense text.
How to Choose a Layout
- Edit the page in the WordPress dashboard.
- In the Page Attributes or Template dropdown, choose one of:
- Default
- Full Page
- Focus Page
- Update or publish the page.
The selected layout will be applied automatically.
Create a Sticky Post
Steps to Make a Post Sticky
- Go to the WordPress Dashboard → Posts → All Posts
- Hover over the post you want to make sticky and click Quick Edit
- Check the option Make this post sticky
- Click Update
Alternatively:
- Open the post in the editor
- In the Post settings (sidebar on the right), expand Status & Visibility
- Check Stick to the top of the blog
- Update or publish the post
Result in Monobase Theme
- Sticky posts will always appear first in the sidebar loops (Homepage, Archive, Single Post sidebar).
- Sticky posts are automatically marked with a "Sticky" badge in the list for better visibility.
- If multiple posts are marked sticky, they will appear first in the same order you selected them.
- Regular posts will follow after sticky posts, respecting the Posts per page setting.
> 💡 Tip: Don’t overuse sticky posts. Use them sparingly for important content to keep your blog structured and easy to scan.
Monobase Pro plugin
Installation and activation
- The process is just like installing a normal plugin. In your WordPress dashboard, go to Plugins → Add New.
- From there you’ll see an option for Upload Plugin.
- Use the file chooser, navigate your computer files, and select the ZIP file for your downloaded plugin.
- Once it’s uploaded, click the “Activate” link.
- Go to the plugin ‘Settings’
- Enter your license key and click ‘Save‘
- After saving the license key, you have to activate it
Customizer Options
Monobase PRO integrates with the WordPress Customizer, allowing you to adjust the global look & feel of your site in real time.
Rounded Theme Style
- Toggle the Rounded theme style option to apply smooth, rounded corners to all theme elements (buttons, cards, widgets).
- Perfect for a modern, soft UI design.
Google Fonts (Monospace)
- Choose from 35 Monoscape Google Fonts.
- Fonts are monospace and developer-friendly (e.g. Fira Code, JetBrains Mono, IBM Plex Mono).
- Selected font will be applied globally to headings, paragraphs, and menus.
Theme Palette
- Pick from 22 predefined palettes to instantly change your site’s accent color.
- Each palette includes all Tailwind color shades (50–900).
- Available palettes:
- Grey,
- Slate,
- Zinc,
- Neutral,
- Stone,
- Rose,
- Pink,
- Fuchsia,
- Purple,
- Violet,
- Indigo,
- Blue,
- Sky,
- Cyan,
- Teal,
- Emerald,
- Green,
- Lime,
- Yellow,
- Amber,
- Orange,
- Red
Note: All Customizer changes are live-previewed before publishing, so you can experiment safely.
Menu Fields
The Monobase PRO plugin extends WordPress Navigation Menus by adding extra fields to every menu item. These options give you more control over how your menus look and behave.
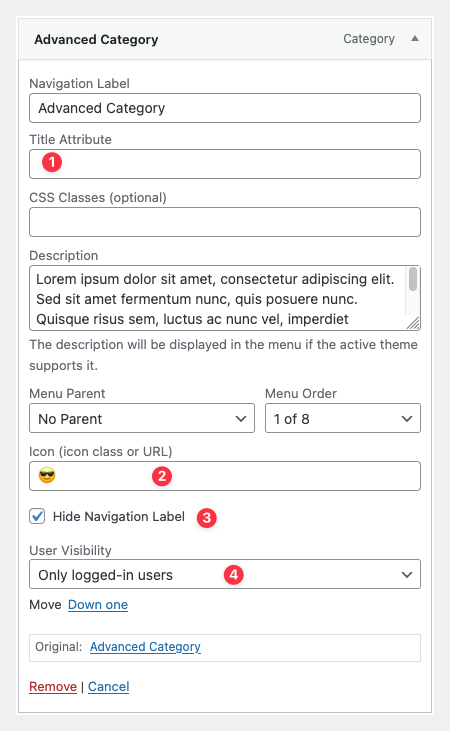
1. Title Attribute
You can set custom text that will appear as a tooltip when a user hovers over the menu item.
👉 Example: “Go to Homepage”
2. Icon
Add a visual icon next to your menu item. Supported formats:
- CSS class (e.g. dashicons-admin-home, fa fa-user)
- Image URL (e.g. https://example.com/icon.png)
- Emoji (e.g. 🔥, ⭐)
The icon will automatically appear before the menu label.
3. Hide Label
Sometimes you want to show only the icon without any text label.
- Enable this option to hide the text.
- Works perfectly in combination with Title Attribute (so users still see a tooltip on hover).
- User Visibility
Control who can see the menu item:
- Everyone → visible to all visitors.
- Logged-in users only → visible only for authenticated users.
- Guests only → visible only for visitors who are not logged in.
Usage Notes
- All new fields appear in the Menu Item Settings when editing a menu under Appearance → Menus.
- Combine fields for advanced use cases (e.g. icon-only button visible only for logged-in users).
- These settings do not affect the WordPress core menu functionality — only add flexibility.
Share Menu
The Share Menu feature allows you to add social sharing buttons directly to your WordPress menus. This makes it easy for visitors to share your content across multiple networks without installing heavy third-party plugins.
How it Works
To create a share button:
- Go to Appearance → Menus.
- Add a new Custom Link.
- In the URL field, enter #service-name.
- Example: #twitter
- The plugin will automatically render this as a share button for the selected service.
Supported Services
You can use the following keywords in the URL field:
#twitter#tumblr#whatsapp#skype#telegram#line#viber#wechat#threema#email#pinterest#digg#stumbleupon#evernote#instapaper#pocket#blogger#livejournal#facebook#linkedin#myspace#draugiem#xing#hacker-news#reddit#buffer#diaspora#douban#qzone#renren#flipboard#mixi#hootsuite#note#snapchat#weibo
Notes
- Each share item will automatically open the share dialog/window for the chosen service.
- You can mix share buttons with regular menu items.
- Use icons for cleaner design (combine with Menu Icon field).
Markdown Editor
Monobase PRO allows you to write content in Markdown instead of the default WordPress editor. This makes writing faster, cleaner, and more developer-friendly.
Markdown Editor for Posts
When enabled, the default post editor is replaced with a lightweight Markdown editor powered by CodeMirror.
- Write posts and pages using Markdown syntax.
- The editor automatically converts Markdown to clean HTML on output. _ Great for technical blogs, documentation, or writers who prefer plain text.
Markdown Editor for Taxonomies
Monobase PRO also extends Markdown support to taxonomy descriptions (Categories, Tags, and custom taxonomies).
- Edit category or tag descriptions with Markdown.
- Use headings, lists, links, and formatting.
- Output is converted to clean HTML when displayed on archive pages.
Notes
- Markdown can be enabled or disabled separately for Posts and Taxonomies in the plugin settings.
- Works alongside the standard WordPress editor — you can still switch back if needed.
- Output is fully sanitized to keep your site secure.
Content Features
Enable Table of Contents
This option allows you to automatically insert a Table of Contents (TOC) into your posts.
- The TOC is generated based on headings (H2–H3) inside the post.
- Helps readers quickly navigate long articles.
- Improves SEO by adding internal anchor links.
Disable Search for Pages
This option gives you control over the built-in WordPress search.
- By default, WordPress search shows both Posts and Pages.
- Enabling this option will exclude Pages from search results.
- Useful if your site uses Pages for static content (e.g. About, Contact) and Posts for articles.
Changelog
= Version 1.0 =
- Initial release