Messenger programs – an integral part of today’s online community. They are services for instant messaging and relevant information exchange between users of the same network. Multifunctional Facebook Messenger has become one of the undisputed leaders on the market.
This speed communication tool is the second most popular messenger in the world and yields by the number of users only to the WhatsApp application. It is great for personal contacts, as well as for the organization of high-quality communication with colleagues, partners and clients of the company. Facebook Messenger belongs to the multi-platform solutions, it has broad functionality and its fan audience.
The benefits of using the service are:
- the ability to communicate freely without visiting the social network site;
- creation of groups and group chats;
- round-the-clock application availability;
- free calls and information exchange between users;
- geolocation;
- the ability to monitor the activity of other chat users and much more.
Regular updating and expanding the applications functionality attracted the interest of commercial entities. It is used actively in corporate communication and establishing contacts with regular customers. Setting up a connection to the Facebook Messenger on a company’s website will attract a great number of interested users. It will provide high-quality feedback and improve service.
1. Modal window creation by Wow Modal Windows Pro.
Creating a connection to the Facebook Messenger via the outputting by user modal window makes possible to establish high quality and non-intrusive feedback on a site. Plugin Wow Modal Windows Pro is simple and easy to use. It has a powerful set of tools for creating and customizing interactive panels.
In this example the window output accessed via the dedicated button. To create it, a new element must be added through the plug-in menu and given a specific name for further easy administration.

You must set the display mode for the resulting popup window while pressing the button. For this purpose, in «Button» menu “Show button” option has to be changed to a positive value.

Via the menu also other options are set for the button, like:
- the location on the page;
- text displayed;
- width;
- its color;
- color change when pointing at it.
The button can be placed at the top or bottom, on the left or right side of the page. As an example, let’s set:
- the buttons positioning on the right side;
- its width 150 px;
- choose the blue gamut for the different status button display;
- enter the text «Messenger» in the field.

The example shows demonstration mode of the modal window (and the button itself) on all pages for all its visitors. You can change settings for specific requests via the “Show modal window” on the menus right side.

To remove the modal window popup effect, which was chosen as a default one, when loading a page, the settings of its display should be changed. It is enough to change the demonstration mode in the menu “Display” for the link opening.

The appearance of a modal window, its closing button and positioning options can be edited with the menu items “Style” and “Close button.”

Via the styles, as an example, such parameters were adjusted:
- the window width;
- border of 1px and its curvature radius;
- window placement;
- background color fills.
The rest are the default settings. For the closing button only the size was changed up to 12 pt.

After saving the modified properties, you can check the buttons operation on the page. Clicking on it displays the modal window with all settings.

The modal window is completely ready for use and filling. Now you must configure the connection to the Facebook messenger.
2. Connecting Facebook Messenger to the site via the created modal window.
The popular platform offers a set of tools for developers and administrators – Facebook for developers. Various social plugins deserve special attention. They allow you to share information from their pages, create subscriptions, and more through the use of third-party resources.
With the help of the “page” plugin Facebook Messenger can be connected to the company’s website and promote its page on the Internet. Among the options are:
- specifying the page address;
- selecting the displaying content type (tabs available – Chronicle, Events and Messages);
- specifying the objects height and width;
- customization of the page external demonstration (profile photo exposure, using a small header and other).

As an example, in the appropriate field the company’s page address is set: https://www.facebook.com/wowaffect/.
Tab type for messaging is selected. Embeddable object is adapted to the containers width, where it will be located.
After clicking on the button “Get the code”, a window appears with the generated code. It takes into account pre-selected settings for the insertion object. Integration framing method has been selected as an example.

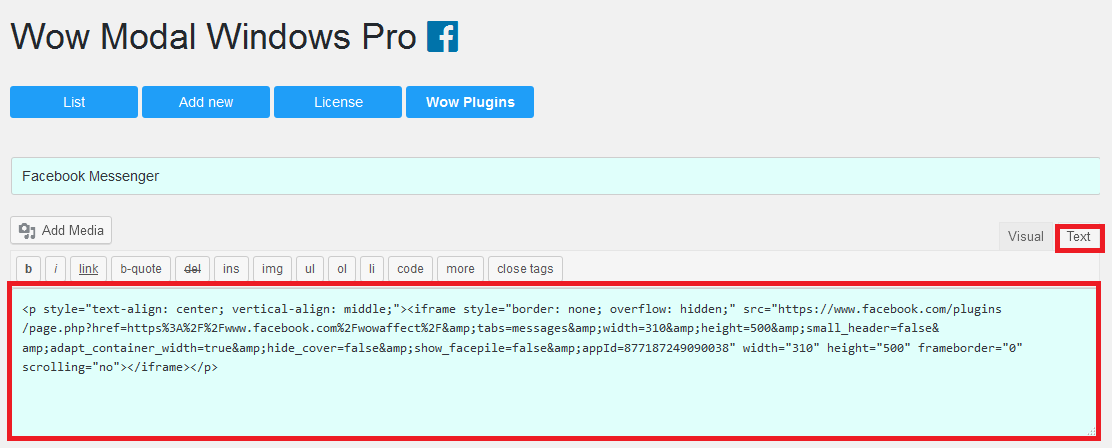
It is enough to copy and paste the code into the pop-up box editor. You need to select the text display information in the settings. Using this tab, you can add and edit HTML-code.

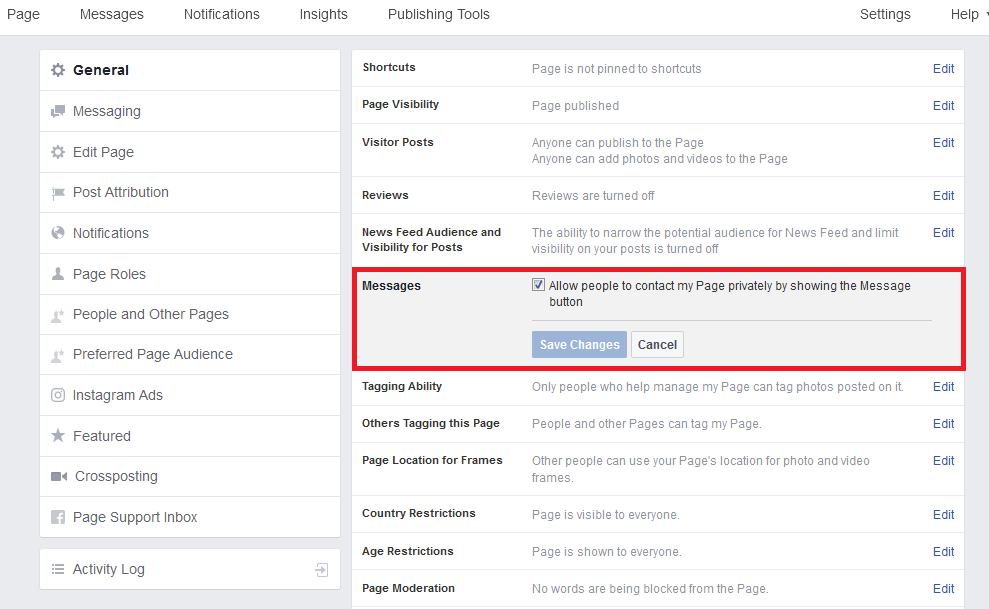
To receive messages from users, it is necessary to enable this option and save the changes in the company’s common page settings on Facebook.

Facebook Messenger, connected via the modal window on a site, requires the user prior authorization in the social network. After confirming your username and password, you can freely use the messenger.

